Financial firms are increasingly keen to embrace cloud technology in new software solutions, or indeed in migrating existing systems over to the cloud. The advantages and disadvantages of the cloud aside, many of the new projects Sinara have been working on have had cloud deployment as an end-goal. Indeed, our SinaraTLC framework was designed from the ground-up to be a cloud-friendly solution, ready to power the next generation of trading systems.
A key technology that we often come across in cloud deployment is Kubernetes, and our teams spent a lot of time in building our understanding of the technicalities as part of the SinaraTLC project. While cloud may seem like a silver bullet to many IT problems, it still involves detailed understanding of new, complex technologies.
So where to start if you are looking at Kubernetes? It can be intimidating when you go through the Kubernetes documents, as there are many ways you can do things and there are few good use cases. We sometimes see some niche features presented alongside common ones. While there are a lot of things to look into with Kubernetes, this article tries to demystify the complexity associated with this technology and give us a more valuable understanding. We’ll take a tour into what Kubernetes is, its architecture, and some helpful commands.
What is Kubernetes
According to the Kubernetes docs, “Kubernetes is a portable, extensible, open-source platform for managing containerized workloads and services, which facilitates both declarative configuration and automation“. From this definition, we can see that Kubernetes is a container orchestration platform. But let’s break it down and think of orchestration as two main things:
- Managing the lifetime of containers
- Managing communication between containers
When learning Kubernetes, it will become helpful when you keep these goals in mind. If you get confused at any point, just imagine how it helps achieve these orchestration goals. In essence, the purpose of Kubernetes is to orchestrate the deployment of containers and streamline the entire process with automation.
The Anatomy and Architecture of Kubernetes
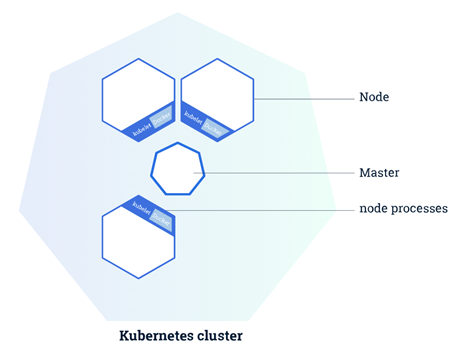
Kubernetes resources could be described as having a “Russian Doll” architecture. To get more experience with this, it is recommended to play around with it by setting up a Minikube test environment. In the meantime, let’s use some diagrams to help.
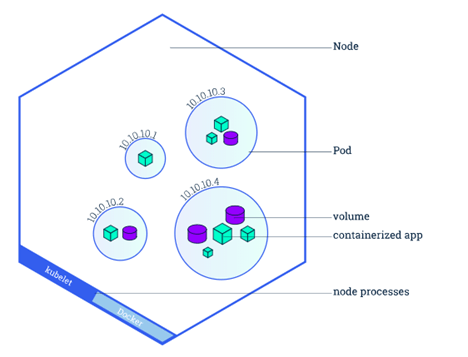
Pods: Pods are the smallest units that can be run in Kubernetes. A pod can contain one or more containers. Typically, for a well-containerized application (e.g. microservices), you want one container per pod. This means everything is running in its own separate little space and can be managed accordingly. Pods are ‘mortal’, if a pod (or the node it executes on) fails, Kubernetes can automatically create a new replica of that pod to continue operations. This has implications for networking—if a pod dies and is replicated, the new pod will not necessarily have the same IP address. This issue is solved by using services to communicate.
Nodes: Nodes are Virtual Machines (VMs) or physical computers that run your pods. The more Nodes you have the more pods you can run and (depending on dependencies) more fault-tolerant you are if one Node goes down. Nodes contain one or more pods. Again, if you want to be super fault-tolerant, then you should go for one pod per node. However, this is unrealistic or over the board for most situations.
Cluster: A cluster is basically the parent containing your whole app. Your set of nodes is a cluster. A cluster must have at least one node to act as the master. It is possible to schedule pods onto the master node of your cluster, but typically, pods are scheduled to worker nodes.
Deployments: Deployments manage the lifetime of containers. A deployment is like a set of declarative statements about how to deploy a pod and how Kubernetes should manage it. For example, a deployment might specify:
- The pod contains one instance of the Trading Platform Docker image (for example)
- Run 3 separate instances of the pod (the number of replicas)
- Ensure each container has 2Gb of memory available to it, but limit it to using a max of 1Gb
- If the pod errors, restart it after 30 seconds
Services: Services (typically) deal with in-cluster communication. Services are the solution to the mortality of pods mentioned previously. Let’s say your database is running in a pod, but since this pod can fail and be recreated with a different IP, you cannot simply send requests to the pod’s IP. We may also have multiple replica pods running the same image, so which pod do we send requests to? Services keep track of the state of a pod and forward the traffic to the correct place.
Ingress: Typically, an ingress forwards requests to the correct service based on the incoming request’s path. For instance, we might configure an ingress to requests to my.oms.com/foo are sent to OrderManagerService-A, and requests to my.oms.com/bar are sent to OrderManagerService-B. Ingresses are not built into Kubernetes by default and an ingress controller plugin must be installed. Ingresses can support many other features such as load balancing and SSL/TLS, depending on the plugin used.
Manifests: We define all our Kubernetes objects (deployments, services, ingresses, etc.) with YAML files called manifests. These define ports, names, docker images to use, startup behavior. You can have kubectl automatically create & apply manifests for you (e.g. kubectl expose deployment order-manager --type=ClusterIP --name=order-manager-service will create a ClusterIP service for you), but it’s probably best to use the YAML files and specify ports yourself. Once you’ve got a manifest to use, apply it with kubectl apply -f /path/to/manifest.yaml.
Helm & Kubernetes
Helm is more of a package manager for Kubernetes. Although they are separate platforms, they are connected in that Helm installs ‘charts’ into Kubernetes, creating a new release for each installation. Moreover, to find new charts, you can search Helm chart repositories. Helm can do a lot of lifting for you.
Chart: A Chart is a Helm package. It contains all the resource definitions necessary to run an application, tool, or service inside of a Kubernetes cluster. Think of it like the Kubernetes equivalent of a Homebrew formula, an Apt dpkg, or a Yum RPM file.
Repository: A Repository is a place where charts can be collected and shared. It is like Perl’s CPAN archive or the Fedora Package Database, but for Kubernetes packages.
Release: A Release is an instance of a chart running in a Kubernetes cluster. One chart can often be installed many times into the same cluster. And each time it is installed, a new release is created. Consider a MySQL chart. If you want two databases running in your cluster, you can install that chart twice. Each one will have its own release, which will in turn have its own release name.
Helpful commands
You can use kubectl to inspect your running instances. The main commands are
kubectl get [component_type], swapping[component_type]for the Kubernetes component type you want to inspect e.g. pods, deployments, services, ingress. `get` gives a short table view of relevant components.kubectl describe [component_type] [component_name], provides a detailed description of component (e.g. port mappings, recent events). you can leave[component_name] blank here, but it will produce a long description of all components of that type.kubectl delete [component_type] [component_name | --all], deletes component matching name or all of that type if--allflag included. Note that if deleting a pod, another instance will be recreated.kubectl logs [pod_name], get error logs for a running pod. Optionally add--previousto the end of the pod has restarted to get the error from the last crash.kubectl exec -it [pod_name] –[bash or sh], open interactive shell for this pod. Note some pods use an even smaller Linux distro so use/bin/sh.
If you have a Kubernetes deployment configured to use the latest version of an image, running
kubectl rollout restart deployment/mydeployment
will apply the latest image from the repository. This happens with zero downtime, as a replica pod will be created and migrated, and your service will forward requests to the available pod.
Advantages of Kubernetes
Apart from the fact that you can benefit from creating and managing a large number of containers and simplifying software development with Kubernetes, there are other advantages to Kubernetes:
- Rapid scaling: This is one of the most popular features of the platform. You do not need to add more servers physically or initialize new VMs, as containers are instantaneously created, which allows the workload to be shared without slowing down performance.
- Security: One other advantage of the Kubernetes architecture is the security it offers. Most traditional cloud applications and solutions are faced with different security threats such as compromised images and cross-service tampering.
- Continuous development: Since each aspect of an application in Kubernetes is its own container, continuous development is very easy, and modification of a single service would not affect the entire framework.
- Cross-platform: Another advantage of Kubernetes is its cross-platform ability; you are not locked into one particular programming language or ecosystem. You can develop any application using any tool or programming language.
Read more on Kubernetes here.